Pages

2013-04-17

DotNet (ASP.Net): Output Caching

We will take a look at the OutputCache directive, which is by far the easiest way of caching content with ASP.NET. As you will see in our example, it doesn’t even require any code – only some minor changes to the markup of the page, and you’re good to go. In the next chapter, we will look into more ways of using the OuputCachce directive. 

Here is a very simple example of a page which will show us the difference between a cached page and a non-cached page. Try creating a new project, and change the Default.aspx page to contain the following markup: 

<%@ Page Language="C#" AutoEventWireup="true"  CodeFile="Default.aspx.cs" Inherits="_Default" %>
<!DOCTYPE html PUBLIC "-//W3C//DTD XHTML 1.0 Transitional//EN" "http://www.w3.org/TR/xhtml1/DTD/xhtml1-transitional.dtd">
<html xmlns="http://www.w3.org/1999/xhtml" >
<head runat="server">
    <title>Caching</title>
</head>
<body>
    <form id="form1" runat="server">
        <%= DateTime.Now.ToString() %>
    </form>
</body>
</html>


This is all standard stuff, except the line with the DateTime. It simply outputs the current date and time to the page. Try running the project and reload the page a couple of times. As you will see, the time is refreshed on each reload. Now, add the following line as line number 2 to our example: 

<%@ OutputCache duration="10" varybyparam="None" %>


Run our project again, and reload the page a number of times. As you will see, the time is only refreshed every 10 seconds. Adding caching to your page is as simple as that! Now, the duration parameter is pretty obvious - it tells the page how many seconds to cache the content. Each time the page is requested, ASP.NET checks if the page is in the cache, and if it is, whether or not it has expired. It's served from the cache if it isn't expired - if it is, the page is removed from the cache and the page is generated from scratch and then placed in the cache.  

The varybyparam is a required parameter of the OutputCache directive. It specifies a list of parameters which the the cache should be varied by. For instance, if you set it to "p", the cache is now depending on the value of the parameter p. Try changing our example to something like this:

<%@ Page Language="C#" AutoEventWireup="true"  CodeFile="Default.aspx.cs" Inherits="_Default" %>
<%@ OutputCache duration="10" varybyparam="p" %>
<!DOCTYPE html PUBLIC "-//W3C//DTD XHTML 1.0 Transitional//EN" "http://www.w3.org/TR/xhtml1/DTD/xhtml1-transitional.dtd">
<html xmlns="http://www.w3.org/1999/xhtml" >
<head runat="server">
    <title>Caching</title>
</head>
<body>
    <form id="form1" runat="server">
        <%= DateTime.Now.ToString() %><br />
        <a href="?p=1">1</a><br />
        <a href="?p=2">2</a><br />
        <a href="?p=3">3</a><br />
    </form>
</body>
</html>


Now, run our example again, and try clicking the links. They each now have their own timestamp, based on when you first accessed the page. The cache is depending on the value of the p parameter! You can specify multiple parameters by seperating them with a semicolon.


2013-04-16

DotNet (WPF): Label and Access keys (mnemonics)

In Windows and other operating systems as well, it's common practice that you can access controls in a dialog by holding down the [Alt] key and then pressing a character which corresponds to the control that you wish to access. The character to press will be highlighted when you hold down the [Alt] key. TextBlock controls doesn't support this functionality, but the Label does, so for control labels, the Label control is usually an excellent choice. Let's look at an example of it in action:

<Window x:Class="WpfTutorialSamples.Basic_controls.LabelControlSample"
        xmlns="http://schemas.microsoft.com/winfx/2006/xaml/presentation"
        xmlns:x="http://schemas.microsoft.com/winfx/2006/xaml"
        Title="LabelControlSample" Height="180" Width="250">
        <StackPanel Margin="10">
                <Label Content="_Name:" Target="{Binding ElementName=txtName}" />
                <TextBox Name="txtName" />
                <Label Content="_Mail:" Target="{Binding ElementName=txtMail}" />
                <TextBox Name="txtMail" />
        </StackPanel>
</Window>


The screenshot shows our sample dialog as it looks when the Alt key is pressed. Try running it, holding down the [Alt] key and then pressing N and M. You will see how focus is moved between the two textboxes.

2013-04-08

DotNet (ASP.Net): Prevent Access to Forbidden Resources


If your Web application manages resources of a type that you don’t want to make publicly available over the Web, you must instruct IIS not to display those files. A possible way to accomplish this consists of forwarding the request to aspnet_isapi and then binding the extension to one of the built-in handlers—the HttpForbiddenHandler class:

<add verb="*" path="*.xyz" type="System.Web.HttpForbiddenHandler" />

Any attempt to access an .xyz resource results in an error message being displayed. The same trick can also be applied for individual resources served by your application. If you need to deploy, say, a text file but do not want to take the risk that somebody can get to it, add the following:

<add verb="*" path="yourFile.txt" type="System.Web.HttpForbiddenHandler" />

DotNet (ASP.Net): Writing Copyright Notes on Images via HTTPHandlers


The .NET Framework graphic engine supports quite a few image formats, including JPEG, GIF, BMP, and  PNG. The whole collection of image formats is in the ImageFormat structure of the System.Drawing namespace. You can save a memory-resident Bitmap object to any of the supported formats by using one of the overloads of the Save method:


Bitmap bmp = new Bitmap(file);
...
bmp.Save(outputStream, ImageFormat.Gif);
When you attempt to save an image to a stream or disk file, the system attempts to locate an encoder for the requested format. The encoder is a module that converts from the native format to the specified format. Note that the encoder is a piece of unmanaged code that lives in the underlying Win32 platform. For each save format, the Save method looks up the right encoder and proceeds.

This example shows how to load an existing image, add some copyright notes, and serve the modified version to the user. In doing so, we’ll load an image into a Bitmap object, obtain a Graphics for that bitmap, and use graphics primitives to write. When finished, we’ll save the result to the page’s output stream and indicate a particular MIME type.


The sample page that triggers the example is easily created, as shown in the following listing:
<html><body><img id="picture" src="dynimage.axd?url=images/pic1.jpg" /></body></html>
The page contains no ASP.NET code and displays an image through a static HTML <img> Tag. The source of the image, though, is an HTTP handler that loads the image passed through the query string and then manipulates and displays it. Here’s the source code for the ProcessRequest method of the HTTP handler:


public void ProcessRequest (HttpContext context){var o = context.Request["url"];if (o == null){context.Response.Write("No image found.");context.Response.End();return;}var file = context.Server.MapPath(o);var msg = ConfigurationManager.AppSettings["CopyrightNote"];if (File.Exists(file)){Bitmap bmp = AddCopyright(file, msg);context.Response.ContentType = "image/jpeg";bmp.Save(context.Response.OutputStream, ImageFormat.Jpeg);bmp.Dispose();}else{context.Response.Write("No image found.");context.Response.End();}}
Note that the server-side page performs two different tasks indeed. First, it writes copyright text on the image canvas; next, it converts whatever the original format was to JPEG:


Bitmap AddCopyright(String file, String msg){// Load the file and create the graphicsvar bmp = new Bitmap(file);var g = Graphics.FromImage(bmp);// Define text alignmentvar strFmt = new StringFormat();strFmt.Alignment = StringAlignment.Center;// Create brushes for the bottom writing// (green text on black background)var btmForeColor = new SolidBrush(Color.PaleGreen);var btmBackColor = new SolidBrush(Color.Black);
// To calculate writing coordinates, obtain the size of // the text given the font typeface and sizevar btmFont = new Font("Verdana", 7);var textSize = g.MeasureString(msg, btmFont);// Calculate the output rectangle and fillfloat x = (bmp.Width-textSize.Width-3);float y = (bmp.Height-textSize.Height-3);float w = (x + textSize.Width);float h = (y + textSize.Height);var textArea = new RectangleF(x, y, w, h);g.FillRectangle(btmBackColor, textArea);// Draw the text and free resourcesg.DrawString(msg, btmFont, btmForeColor, textArea);btmForeColor.Dispose();btmBackColor.Dispose();btmFont.Dispose();g.Dispose();return bmp;


2013-04-03

DotNet: Using .NET Classes from COM - Part 2

After you have compiled an assembly that is visible to COM, it isn't automatically made available to COM clients. To make your code available to COM clients, you need to register your COM objects in the registry in a method similar to the way you would register your unmanaged C++ or VB6 COM objects. To register a .NET-hosted COM object, you use the regasm command-line SDK tool, as shown in the following example:


regasm ComVisibleLibrary.dll /tlb:ComVisibleLibrary.tlb

This will not only register your library with all the other COM objects on the machine, but it will also export a usable type library based on your assembly.

You might think that when you have a .NET COM object registered, you can consume that .NET COM object from managed code. If you try to reference your own COM object from within .NET, you will receive an error message indicating that you cannot create a COM reference to a .NET assembly. This is, of course, for a good reason. If there is a .NET assembly available, there is no need for managed code to use COM, as it would add a lot of unnecessary overhead. 

To reference your .NET-hosted COM object from an unmanaged language, simply use whatever tools you would normally use to consume unmanaged COM components to reference the .NET-hosted component. The COM-Callable Wrapper that .NET places between the unmanaged COM code and your managed code abstracts the fact that it is a .NET object. 

The benefit of this is that unmanaged COM clients can use .NET-hosted COM objects and regular/legacy COM objects interchangeably without having to do any additional work.


DotNet: Using .NET Classes from COM - Part 1


Exposing your .NET classes to COM is easy. All you have to do is decorate the class, member, or assembly with the ComVisible attribute and that will be enough for the registration tool to determine what information to include in the type library when it is created. To follow along with the samples you are about to see, just create a new class library called ComVisibleLibrary.

The easiest way to expose your code to COM is to expose your entire assembly to COM. You can do this by manually editing your AssemblyInfo.cs file, or you can right-click your project, choose Properties, and then click the Assembly Information button. You will see a dialog like the one shown below. Just check the checkbox indicating that the assembly is visible to COM:


To test this out, change the Class1.cs class definition in the ComVisibleLibrary class library from the stock definition to the following:

using System;
using System.Runtime.InteropServices;
using System.Collections.Generic;
using System.Text;

namespace ComVisibleLibrary
{
[ComVisible(true)]
public class ComVisibleClass
{
public void DoSomething()
{
    Console.WriteLine("Hello from within a COM object");
}
}
}

DotNet: Introduction to DotNet AppDomains


Whereas the assembly is a logical unit of deployment, the AppDomain is a logical unit of execution. The AppDomain is a sandbox in which .NET code runs. The AppDomain provides a container in which code can execute safely, knowing that code running outside the AppDomain cannot negatively impact it. As you will see throughout this book, cross-process communication done with Remoting is actually the process of passing information between AppDomains, whether they are on the same machine or different machines.

Throughout the course of an application, your code may load a lot of assemblies creating instances of other classes. Without the use of the AppDomain class, all of those assemblies will remain in memory for the lifespan of your application. If you are coding a long-running server application, this is unacceptable. Using the AppDomain class, however, you can manually control the loading and unloading of assemblies, as well as create an isolated environment to run potentially volatile tasks.

To illustrate how to program with AppDomains, we are going to create a solution that has a console application and a class library. The code in the console application is going to create a new AppDomain and use that new AppDomain to execute code within the class library. When that secondary code is finished executing, the code in the console application will then unload the temporary AppDomain, illustrating how you can gain tight control over the memory consumption of your application by manually loading and unloading certain AppDomains. 

using System;
using System.Reflection;
using System.Collections.Generic;
using System.Text;

namespace SecondaryCode
{
public class Class1 : MarshalByRefObject
{
public void DoWork()
{
    Console.WriteLine("[{0}] Doing some work.",
        AppDomain.CurrentDomain.FriendlyName);
    Console.WriteLine("[{0}] Domain-Wide value is {1}",
        AppDomain.CurrentDomain.FriendlyName,
        AppDomain.CurrentDomain.GetData("THEVALUE"));
    Console.WriteLine("This domain currently has {0} Assemblies loaded.",
        AppDomain.CurrentDomain.GetAssemblies().Length.ToString());
    foreach (Assembly a in AppDomain.CurrentDomain.GetAssemblies())
    {
        Console.WriteLine("\t{0}", a.GetName().Name);
    }
}
}
}

namespace AppDomainSample
{
class Program
{
static void Main(string[] args)
{
    Console.WriteLine("[{0}] Main Application starting.",
AppDomain.CurrentDomain.FriendlyName) ;
    Console.WriteLine("Main AppDomain has {0} Assemblies Loaded.",
        AppDomain.CurrentDomain.GetAssemblies().Length.ToString());

    AppDomain ad = AppDomain.CreateDomain("WorkerDomain");
    ad.SetData("THEVALUE", "How much wood could a woodchuck chuck...");
    SecondaryCode.Class1 remoteType =
        (SecondaryCode.Class1)ad.CreateInstanceFromAndUnwrap("SecondaryCode.dll",
        "SecondaryCode.Class1");

    remoteType.DoWork();
    AppDomain.Unload(ad);

    Console.ReadLine();

}
}
}


DotNet: Using the ThreadPool Class

When it boils down to it, one of the most common states of any application is the "idle" state. Applications spend a lot of time sitting around waiting for something to happen. They're either waiting for a user to click something on a form, or they're waiting for a request to come in on a network port like HTTP or a custom service port. Using full-fledged foreground threads when sitting around waiting for something to happen is more expensive than necessary.

To allow you to create tasks that will operate in the background, but consume the smallest amount of resources possible, the .NET Framework has the thread pool.

The thread pool uses a WaitCallback delegate instead of a ThreadStart delegate to indicate the work that should be done in the background. In addition, the thread pool makes it easy to queue up a work item and let it run. You can also pass in a state object so that you can supply a worker thread with the data it needs to perform its task without having to rely on static members or complicated scope management techniques. Without the state object being passed to a worker thread, the worker thread would need to pull its information from global or static objects. When this happens, the thread needs to worry about synchronization of that data. Using the private state object that is scoped at the thread level, there is no need for synchronization since the data belongs only to the current thread.

The listing provides a quick illustration of how to queue a user work item. Note that you don't have to explicitly Start the background thread from the pool. The upside of the thread pool is its ease of use. However, if you need complex synchronization techniques such as events, or if you need to call Join on a list of threads as shown in preceding examples, you may find the thread pool insufficient for your needs.

using System;
using System.Threading;
using System.Collections.Generic;
using System.Text;

namespace ThreadPoolDemo
{
class Program
{
static void Main(string[] args)
{
    for (int i = 0; i < 20; i++)
    {
        ThreadPool.QueueUserWorkItem(
            new WaitCallback(DoWork), i);
    }

    Console.ReadLine();

}

static void DoWork(object state)
{
    int threadNumber = (int)state;
    Console.WriteLine("Thread {0} reporting for duty.", state);
}
}
}


DotNet: Introduction to Events


Events are a way to allow a class to send a signal indicating that an event of some importance has taken place. Events are most commonly used in the Windows Forms user interface, sending signals indicating that the user has clicked on a button, typed characters, moved the mouse, or any number of other events.

Events can also be used to indicate other important events that don't have anything to do with a user interface, such as indicating that an object's internal state has changed, that data in a list has changed, and so on.

Events are created from delegates using the event keyword. First, you declare the delegate:

delegate void StateChangedDelegate(object state);

Then you declare the event as a member of a class:

public event StateChangedDelegate OnStateChanged;

Finally, the class interested in the event can subscribe to the event in a syntax that should look familiar to you given your recent exposure to multicast delegates:

myClass.OnStateChanged += new StateChangedDelegate(myClass.StateChangedEventHandler);

Now the subscribing class will be notified every time the other class's state changes. By using events, you can then have one piece of code that is responsible for performing the task, and you could have the user interface environment subscribe to the progress event. This loose coupling allows you to reuse your code without any modification in any GUI environment.


2013-03-29

DotNet: Include Code Selectively at Build Time

So you need to selectively include and exclude sections of source code from your compiled assembly?


Use the #if, #elif, #else, and #endif preprocessor directives to identify blocks of code that should be
conditionally included in your compiled assembly. Use the System.Diagnostics.ConditionalAttribute
attribute to define methods that should be called conditionally only. If you apply ConditionalAttribute to a method, the compiler will ignore any calls to the method if the symbol specified by ConditionalAttribute is not defined at the calling point.Control the inclusion of the conditional code using the #define and #undef directives in your code, or use the /define switch when you run the C# compiler from the command line.

Using ConditionalAttribute centralizes your conditional compilation logic on the method
declaration and means you can freely include calls to conditional methods without littering your code
with #if directives. However, because the compiler literally removes calls to the conditional method
from your code, your code can’t have dependencies on return values from the conditional method. This
means you can apply ConditionalAttribute only to methods that return void and do not use “out”
modifiers on their arguments.


[Conditional("DEBUG")]
public static void DumpState()
{
Console.WriteLine("Dump some state...");
}


2013-03-28

DotNet: Creating Code Snippet in Visual Studio 2010 - Part 2


Although the snippet is working, you still have a few things to polish. First, you have unnecessary line breaks above and below the inserted statement. Second, you defi nitely would not like to use the default message but rather should type the one fitting with the source code context. Before typing this custom message, select the default one. Now you must struggle a bit with whether to use either the mouse or the keyboard. Let ’ s remove these small pains and modify the < Snippet > section:


< ?xml version=”1.0” encoding=”utf-8”? >
< CodeSnippets xmlns=”http://schemas.microsoft.com/VisualStudio/2005/CodeSnippet” >
< CodeSnippet Format=”1.0” >
< Header >
< Title > Write a message to the console < /Title >
< Shortcut > wmc < /Shortcut >
< Author >Your Name Here< /Author >
< Description >
This snippet inserts a “Console.WriteLine” invocation into the code.
< /Description >
< SnippetTypes >
< SnippetType > Expansion < /SnippetType >
< /SnippetTypes >
< /Header >
< Snippet >
< Declarations >
< Literal >
< ID > message < /ID >
< ToolTip > The message to write to the console < /ToolTip >
< Default > Message < /Default >
< /Literal >
< /Declarations >

< Code Language=”CSharp” >
< ![CDATA[Console.WriteLine(“$message$”);]] >
< /Code >
< /Snippet >
< /CodeSnippet >
< /CodeSnippets >
Note the addition of a < Declarations > section to the < Snippet > section defining a literal
parameter named message . Also note that the Code element has been modified by removing the
unnecessary line breaks and adding a reference to the message literal enclosed in dollar signs.
Save and import the modified snippet declaration again. The Code Snippets Manager recognizes
that you are importing a snippet file that has already been added to the folder. It pops up a dialog
to enable you to decide whether you want to rename or overwrite, or maybe skip it. Choose to
overwrite, and the modified snippet will replace the original one.Let ’ s try that out. After typing “ wmc ” and pressing the Tab key twice, the snippet ’ s code is inserted and the “ Message ” text is automatically selected, allowing you to replace it with the text you type in. 

DotNet: Creating Code Snippet in Visual Studio 2010 - Part 1


Without a doubt, code snippets would not provide enough value if you were constrained to using
only snippets shipped with Visual Studio. Of course, you can always add your own snippets to the
library of existing ones. You don ’ t have to stop at creating general - purpose code snippets, since you
can also tailor them to your special needs.In the following discussions, you will learn how easy it is to create a code snippet using XML format, as well as the nitty - gritty details of this particular format.

Creating a Simple Code Snippet

Create a new XML fi le by selecting File ➪ New ➪ File, and then select the XML file format from
the listed options. Change the name of the file to ConsoleSnippet.snippet and create it.
Select the document window of the newly created fi le and view its properties. To enable the
IntelliSense support for editing, assign the appropriate XSD fi le to this .snippet file with help of
Schemas in the property window. By clicking the ellipsis button belonging to this property, you can
set this schema with the ensuing dialog.

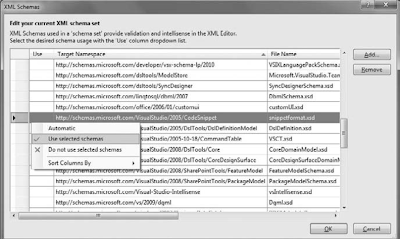
Toward the middle of the list, you will fi nd the target namespace ending with CodeSnippet with a
file name snippetformat.xsd . Right - click on this row, and click on the “ Use selected schemas ” item
in the context menu, as shown below. Close the dialog with OK.


The .snippet extension is reserved by Visual Studio for code snippet definitions.

Writing the Code Snippet Definition


You now can type in the definition of the snippet. IntelliSense and code completion will help you accelerate the typing.

< ?xml version=”1.0” encoding=”utf-8”? >
< CodeSnippets xmlns=”http://schemas.microsoft.com/VisualStudio/2005/CodeSnippet” >
< CodeSnippet Format=”1.0” >
< Header >
< Title > Write a message to the console < /Title >
< Shortcut > wmc < /Shortcut >
< Author > Your Name Here < /Author >
< Description >
This snippet inserts a “Console.WriteLine” invocation into the code.
< /Description >
< SnippetTypes >
< SnippetType > Expansion < /SnippetType >
< /SnippetTypes >
< /Header >
< Snippet >
< Code Language=”CSharp” >
< ![CDATA[
Console.WriteLine(“This is a message”);
]] >
< /Code >
< /Snippet >
< /CodeSnippet >
< /CodeSnippets >
Importing the Code Snippet 


To make the snippet available in Visual Studio, go to the Tools ➪ Code Snippets Manager dialog.
In the Language drop - down, select Visual C#. Below the Language drop - down, you will see a
few folders listed. Select the My Code Snippets folder and click on the Import button.
A Code Snippets Directory file - selection dialog pops up on the screen to enable you to select
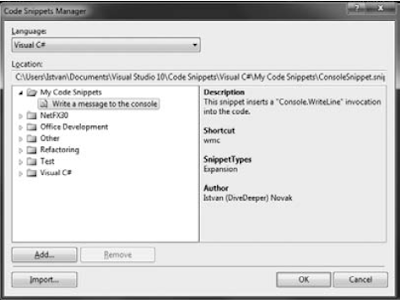
a .snippet fi le. Select the ConsoleSnippet.snippet file from the folder where you previously saved it. Click Open. The Import Code Snippet dialog then opens to enable you to select the location of the specified snippet fi le. Click Finish to signal that you accept the location. The new code snippet fi le is imported. You can see it in the Code Snippets Manager when you expand the My Code Snippets folder, as shown below.

  
Accessing and Using the New Snippet 


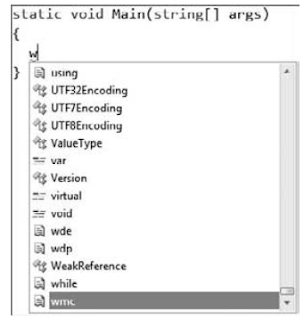
To begin, create a C# console application and open the Program.cs file. Look for a position where a statement can be inserted, and press the “ w ” key. IntelliSense automatically opens a list of possible completions for “ w, ” as shown below.


2013-01-30

Node.js: Inheriting from Node Event Emitter


If you are interested in using Node’s event emitter pattern throughout your application, you can create a pseudo-class and make it inherit from EventEmitter like this:


util = require('util');var EventEmitter = require('events').EventEmitter;

// Here is the MyClass constructor:

var MyClass = function() {}util.inherits(MyClass, EventEmitter);
By creating a class that inherits from EventEmitter, instances of MyClass can emit events:


MyClass.prototype.someMethod = function() {this.emit("custom event", "argument 1", "argument 2");};
Here, when the someMethod method is called on an instance of MyClass, the example emits an event
named custom event. The event also emits some data, in this case two strings: "argument 1" and
"argument 2". This data will be passed along as arguments to the event listeners.


Clients of MyClass instances can listen to the event named custom event like this:
var myInstance = new MyClass();myInstance.on('custom event', function(str1, str2) {console.log('got a custom event with the str1 %s and str2 %s!', str1, str2);});
For example, you could build a pseudo-class named Ticker that emits a “tick” event every second: 

var util = require('util'),EventEmitter = require('events').EventEmitter;var Ticker = function() {var self = this;setInterval(function() {self.emit('tick');}, 1000);};util.inherits(Ticker, EventEmitter);

Clients of this class could instantiate this Ticker class and listen for the “tick” events like so:
var ticker = new Ticker();ticker.on("tick", function() {console.log("tick");});


2013-01-21

TI MSP430: Understanding BCS (Basic Clock System)

Each family of MSP430 has a slightly different clock system, though many of the principles are the same for each.  The x2xx family uses the BCS+ system, which provides the MSP430 with three separate clocks that can run as quickly as 16 MHz in particular conditions.  

The reason we have three clocks instead of just one or even two is to compromise between systems that need speed and the ability to minimize power consumption, one of the real hallmarks of the MSP430.  Faster clocks consume more power, so to really reduce the power used we need slower clocks.  But some functions need to respond and conclude quickly, so we also need fast clocks.  

You can design around the use of a single clock, but having the flexibility of three is powerful.  Let's look at the three clocks available in BCS+:


  • MCLK:  This is the Master Clock, the one that drives the processor and times the commands in your program.  This is typically a high frequency clock, but can be configured for low frequencies if needed.
  • SMCLK: The Sub-Main Clock is a secondary clock that is often used by other peripherals.  It can be the same frequency as MCLK or different, depending on the application.
  • ACLK: The Auxilliary Clock is usually timed outside the MSP430 and is typically used for peripherals.  Often, this is a low frequency clock, but can also be used at high frequencies when desired.
There are also up to four sources available in BCS+ to drive each of the three clocks:
  • LFXT1CLK:  The name of this source implies its use with a low-frequency crystal, and this is often the case.  A 32,768 Hz crystal can be connected to your MSP430 for low-power, high-accuracy timing.  In some x2xx devices, this source also has a high frequency mode that can use crystals from 400 kHz to 16 MHz, assuming the chip is powered with a large enough voltage to handle the frequency.  In addition, other resonators and external signals can be used for this source.
  • XT2CLK:  Again, this source is named for its implied use with a second crystal, but in this case only a high frequency crystal.  It can also use other resonators and external signals.  This source is not available on every x2xx device.  (See page 5-2 of the x2xx Family User's Guide to see which devices use XT2.)
  • DCOCLK:  The internal source is the digitally controlled oscillator.  Though not as accurate and stable as crystal sources, the DCO is still quite good and can be configured to operate at a wide range of frequencies.
  • VLOCLK:  The MSP430 includes a second internal oscillator for very-low power, very-low frequency applications.  The VLO can run slower than the LFXT1 watch crystal, and typically is used at about 12 kHz.  This source is not available in all x2xx devices.  (Refer to 5-2 in the User's Guide.)
Each clock can also divide the frequency by which it's sourced by a factor of 2, 4, or 8.  In addition, many peripherals can further divide their clock by the same factors, giving a large number of possible frequencies available from just one source.  

While MCLK and SMCLK can use any of the four sources, ACLK uses only LFXT1 or VLO.  The default configuration for MCLK and SMCLK is to use the DCO at about 1.1 MHz, and for ACLK is to use LFXT1.