Without a doubt, code snippets would not provide enough value if you were constrained to using
only snippets shipped with Visual Studio. Of course, you can always add your own snippets to the
library of existing ones. You don ’ t have to stop at creating general - purpose code snippets, since you
can also tailor them to your special needs.In the following discussions, you will learn how easy it is to create a code snippet using XML format, as well as the nitty - gritty details of this particular format.
Creating a Simple Code Snippet
the listed options. Change the name of the file to ConsoleSnippet.snippet and create it.
Select the document window of the newly created fi le and view its properties. To enable the
IntelliSense support for editing, assign the appropriate XSD fi le to this .snippet file with help of
Schemas in the property window. By clicking the ellipsis button belonging to this property, you can
set this schema with the ensuing dialog.
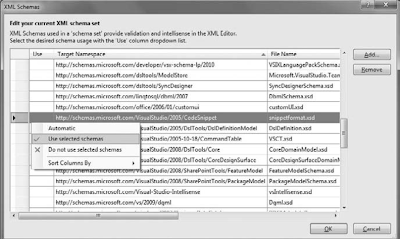
Toward the middle of the list, you will fi nd the target namespace ending with CodeSnippet with a
file name snippetformat.xsd . Right - click on this row, and click on the “ Use selected schemas ” item
in the context menu, as shown below. Close the dialog with OK.
The .snippet extension is reserved by Visual Studio for code snippet definitions.
Writing the Code Snippet Definition
You now can type in the definition of the snippet. IntelliSense and code completion will help you accelerate the typing.
< ?xml version=”1.0” encoding=”utf-8”? >Importing the Code Snippet
< CodeSnippets xmlns=”http://schemas.microsoft.com/VisualStudio/2005/CodeSnippet” >
< CodeSnippet Format=”1.0” >
< Header >
< Title > Write a message to the console < /Title >
< Shortcut > wmc < /Shortcut >
< Author > Your Name Here < /Author >
< Description >
This snippet inserts a “Console.WriteLine” invocation into the code.
< /Description >
< SnippetTypes >
< SnippetType > Expansion < /SnippetType >
< /SnippetTypes >
< /Header >
< Snippet >
< Code Language=”CSharp” >
< ![CDATA[
Console.WriteLine(“This is a message”);
]] >
< /Code >
< /Snippet >
< /CodeSnippet >
< /CodeSnippets >
To make the snippet available in Visual Studio, go to the Tools ➪ Code Snippets Manager dialog.
In the Language drop - down, select Visual C#. Below the Language drop - down, you will see a
few folders listed. Select the My Code Snippets folder and click on the Import button.
A Code Snippets Directory file - selection dialog pops up on the screen to enable you to select
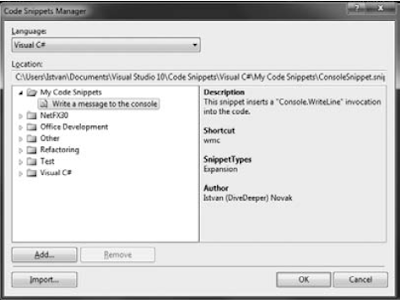
a .snippet fi le. Select the ConsoleSnippet.snippet file from the folder where you previously saved it. Click Open. The Import Code Snippet dialog then opens to enable you to select the location of the specified snippet fi le. Click Finish to signal that you accept the location. The new code snippet fi le is imported. You can see it in the Code Snippets Manager when you expand the My Code Snippets folder, as shown below.
Accessing and Using the New Snippet
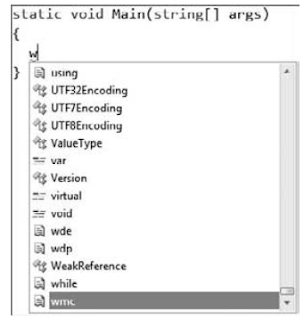
To begin, create a C# console application and open the Program.cs file. Look for a position where a statement can be inserted, and press the “ w ” key. IntelliSense automatically opens a list of possible completions for “ w, ” as shown below.


No comments:
Post a Comment