Pages

2013-03-29

DotNet: Include Code Selectively at Build Time

So you need to selectively include and exclude sections of source code from your compiled assembly?


Use the #if, #elif, #else, and #endif preprocessor directives to identify blocks of code that should be
conditionally included in your compiled assembly. Use the System.Diagnostics.ConditionalAttribute
attribute to define methods that should be called conditionally only. If you apply ConditionalAttribute to a method, the compiler will ignore any calls to the method if the symbol specified by ConditionalAttribute is not defined at the calling point.Control the inclusion of the conditional code using the #define and #undef directives in your code, or use the /define switch when you run the C# compiler from the command line.

Using ConditionalAttribute centralizes your conditional compilation logic on the method
declaration and means you can freely include calls to conditional methods without littering your code
with #if directives. However, because the compiler literally removes calls to the conditional method
from your code, your code can’t have dependencies on return values from the conditional method. This
means you can apply ConditionalAttribute only to methods that return void and do not use “out”
modifiers on their arguments.


[Conditional("DEBUG")]
public static void DumpState()
{
Console.WriteLine("Dump some state...");
}


2013-03-28

DotNet: Creating Code Snippet in Visual Studio 2010 - Part 2


Although the snippet is working, you still have a few things to polish. First, you have unnecessary line breaks above and below the inserted statement. Second, you defi nitely would not like to use the default message but rather should type the one fitting with the source code context. Before typing this custom message, select the default one. Now you must struggle a bit with whether to use either the mouse or the keyboard. Let ’ s remove these small pains and modify the < Snippet > section:


< ?xml version=”1.0” encoding=”utf-8”? >
< CodeSnippets xmlns=”http://schemas.microsoft.com/VisualStudio/2005/CodeSnippet” >
< CodeSnippet Format=”1.0” >
< Header >
< Title > Write a message to the console < /Title >
< Shortcut > wmc < /Shortcut >
< Author >Your Name Here< /Author >
< Description >
This snippet inserts a “Console.WriteLine” invocation into the code.
< /Description >
< SnippetTypes >
< SnippetType > Expansion < /SnippetType >
< /SnippetTypes >
< /Header >
< Snippet >
< Declarations >
< Literal >
< ID > message < /ID >
< ToolTip > The message to write to the console < /ToolTip >
< Default > Message < /Default >
< /Literal >
< /Declarations >

< Code Language=”CSharp” >
< ![CDATA[Console.WriteLine(“$message$”);]] >
< /Code >
< /Snippet >
< /CodeSnippet >
< /CodeSnippets >
Note the addition of a < Declarations > section to the < Snippet > section defining a literal
parameter named message . Also note that the Code element has been modified by removing the
unnecessary line breaks and adding a reference to the message literal enclosed in dollar signs.
Save and import the modified snippet declaration again. The Code Snippets Manager recognizes
that you are importing a snippet file that has already been added to the folder. It pops up a dialog
to enable you to decide whether you want to rename or overwrite, or maybe skip it. Choose to
overwrite, and the modified snippet will replace the original one.Let ’ s try that out. After typing “ wmc ” and pressing the Tab key twice, the snippet ’ s code is inserted and the “ Message ” text is automatically selected, allowing you to replace it with the text you type in. 

DotNet: Creating Code Snippet in Visual Studio 2010 - Part 1


Without a doubt, code snippets would not provide enough value if you were constrained to using
only snippets shipped with Visual Studio. Of course, you can always add your own snippets to the
library of existing ones. You don ’ t have to stop at creating general - purpose code snippets, since you
can also tailor them to your special needs.In the following discussions, you will learn how easy it is to create a code snippet using XML format, as well as the nitty - gritty details of this particular format.

Creating a Simple Code Snippet

Create a new XML fi le by selecting File ➪ New ➪ File, and then select the XML file format from
the listed options. Change the name of the file to ConsoleSnippet.snippet and create it.
Select the document window of the newly created fi le and view its properties. To enable the
IntelliSense support for editing, assign the appropriate XSD fi le to this .snippet file with help of
Schemas in the property window. By clicking the ellipsis button belonging to this property, you can
set this schema with the ensuing dialog.

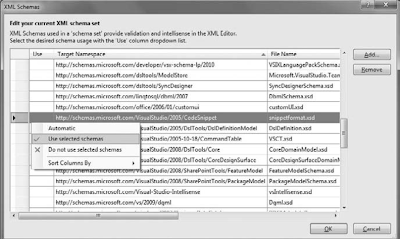
Toward the middle of the list, you will fi nd the target namespace ending with CodeSnippet with a
file name snippetformat.xsd . Right - click on this row, and click on the “ Use selected schemas ” item
in the context menu, as shown below. Close the dialog with OK.


The .snippet extension is reserved by Visual Studio for code snippet definitions.

Writing the Code Snippet Definition


You now can type in the definition of the snippet. IntelliSense and code completion will help you accelerate the typing.

< ?xml version=”1.0” encoding=”utf-8”? >
< CodeSnippets xmlns=”http://schemas.microsoft.com/VisualStudio/2005/CodeSnippet” >
< CodeSnippet Format=”1.0” >
< Header >
< Title > Write a message to the console < /Title >
< Shortcut > wmc < /Shortcut >
< Author > Your Name Here < /Author >
< Description >
This snippet inserts a “Console.WriteLine” invocation into the code.
< /Description >
< SnippetTypes >
< SnippetType > Expansion < /SnippetType >
< /SnippetTypes >
< /Header >
< Snippet >
< Code Language=”CSharp” >
< ![CDATA[
Console.WriteLine(“This is a message”);
]] >
< /Code >
< /Snippet >
< /CodeSnippet >
< /CodeSnippets >
Importing the Code Snippet 


To make the snippet available in Visual Studio, go to the Tools ➪ Code Snippets Manager dialog.
In the Language drop - down, select Visual C#. Below the Language drop - down, you will see a
few folders listed. Select the My Code Snippets folder and click on the Import button.
A Code Snippets Directory file - selection dialog pops up on the screen to enable you to select
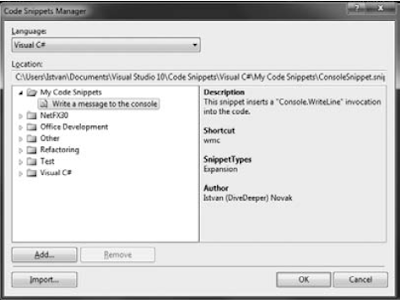
a .snippet fi le. Select the ConsoleSnippet.snippet file from the folder where you previously saved it. Click Open. The Import Code Snippet dialog then opens to enable you to select the location of the specified snippet fi le. Click Finish to signal that you accept the location. The new code snippet fi le is imported. You can see it in the Code Snippets Manager when you expand the My Code Snippets folder, as shown below.
  
Accessing and Using the New Snippet 


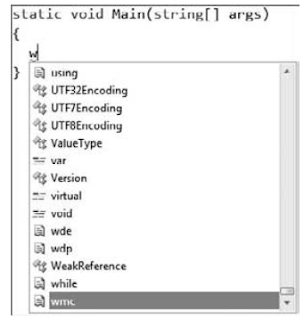
To begin, create a C# console application and open the Program.cs file. Look for a position where a statement can be inserted, and press the “ w ” key. IntelliSense automatically opens a list of possible completions for “ w, ” as shown below.